The GA4 way of Meta eCom – The failing way
Google Tag Manager (GTM), as the name really well explains, is a Google product.
Completely based on Google’s architecture and ‘way of thinking’.
For e-commerce, it’s Google’s GA4 that sets the market standards for Event Naming and Datalayer Structures.
We’re all really accustomed to triggering our tags using eCom events like ‘add_to_cart’, ‘begin_checkout’, and ‘purchase’, right?
Even 3rd party software, like WooCommerce, follows the same structure in its architecture.
Still other Ad platforms, like Facebook Ads (FAds), actually have their own structure (find the bonus part at the bottom for a custom Event Name solution using a Lookup Table).
A proper Server-Side Tracking Setup needs a few extra steps to make sure the data is according to their parameter standards.
Since Server-Side GTM (sGTM) does not allow for Custom JavaScript (CJS), other solutions have to be implemented.
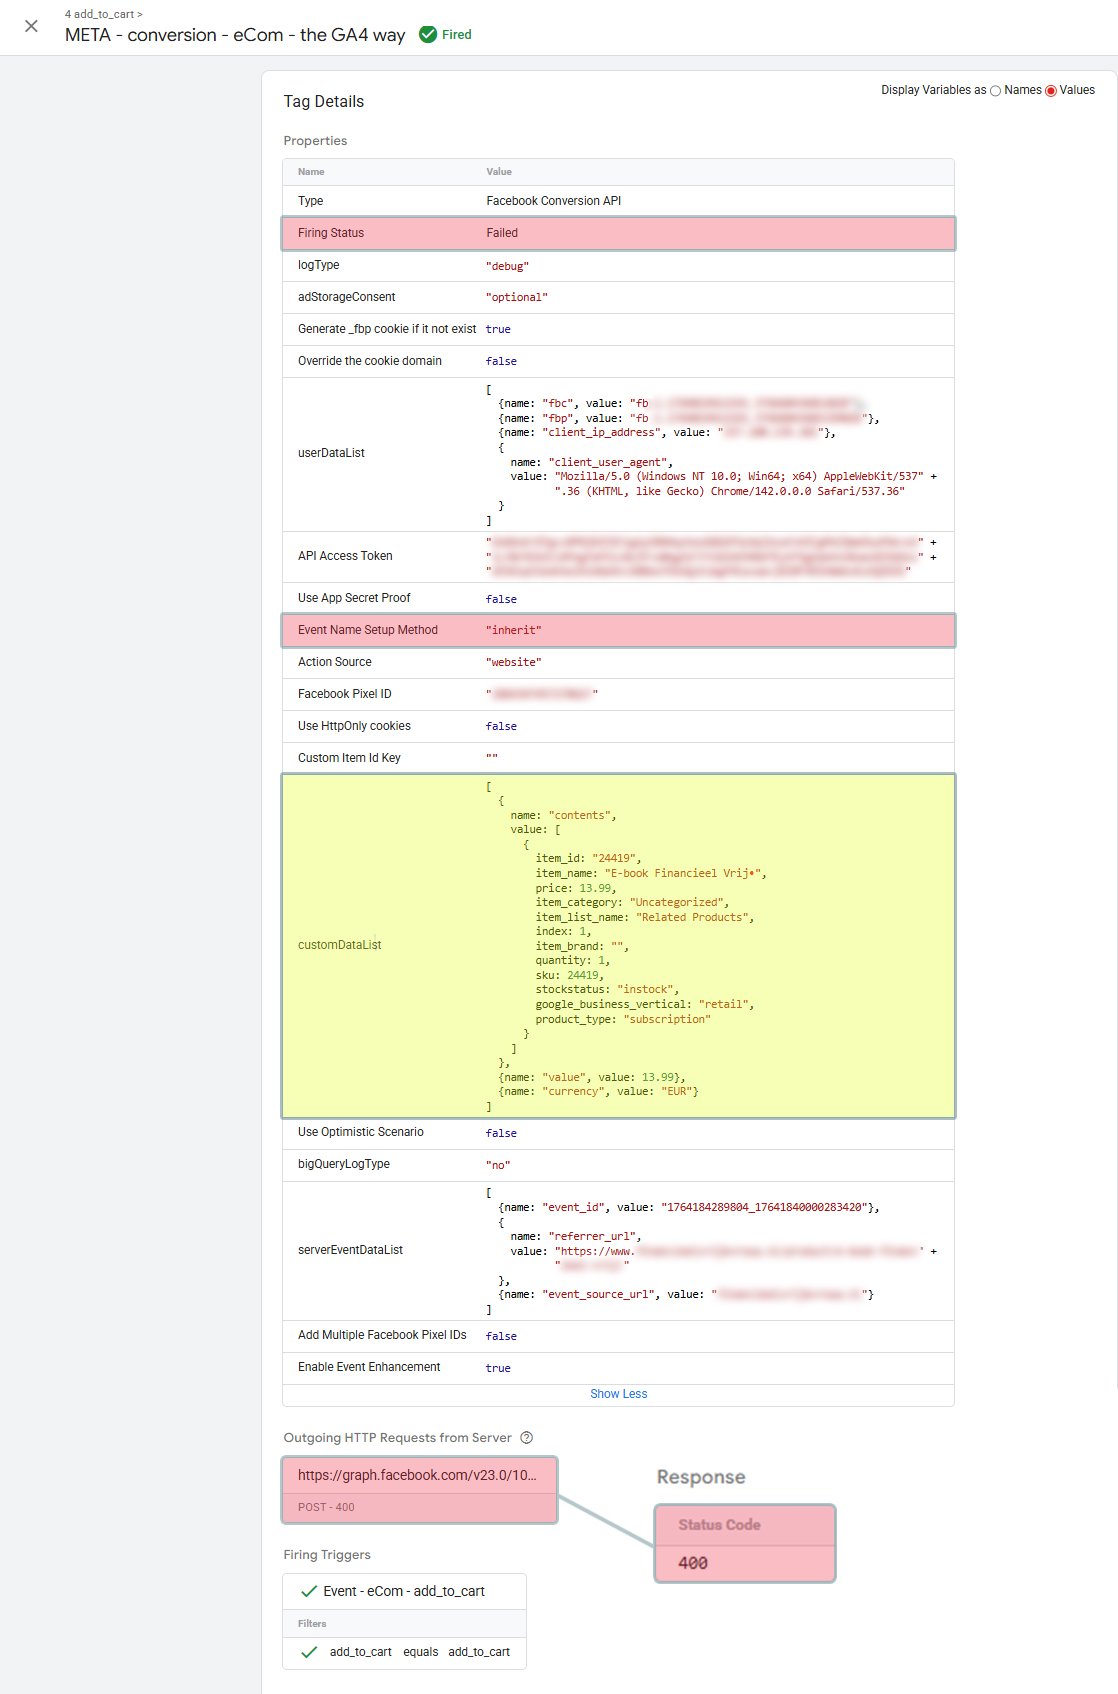
In the example, you can see that the FAds CAPI tag fired, with a green ‘Fired’ on top.
But if you look closely at the red-highlighted areas, you can see that the tag actually failed (Firing Status = Failed & HTTP Request = Response 400 – Bad Request).
The tag did not fail on any consent signal, Pixel ID, or API access token.
It failed because of the GA4 style ‘Item Array’ in the yellow-highlighted area. Although perfectly fine for Google products, it does not follow the Facebook Ads Parameter Standard.
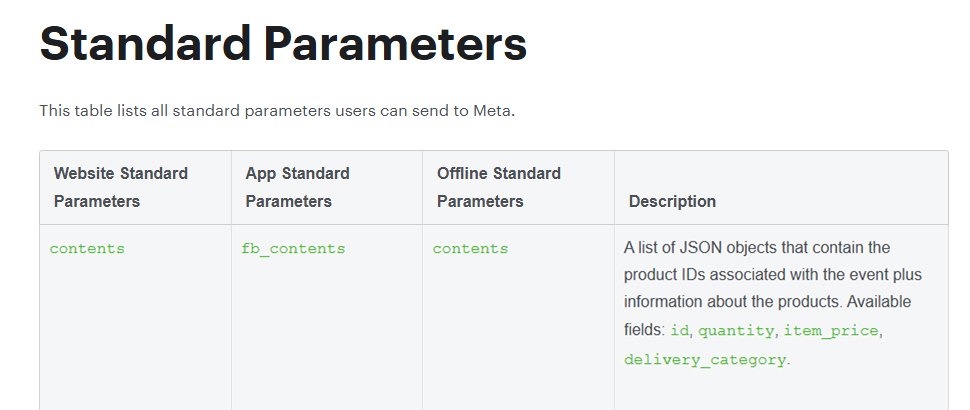
Facebook Ads Parameter Standard
We have to follow the parameter-standard, in this case the one from Facebook Ads, to make sure the tag will fire with a HTTP status code 200 OK.
Use the following URL to check the Facebook Standard Parameters for yourself: https://developers.facebook.com/docs/marketing-api/conversions-api/parameters/custom-data
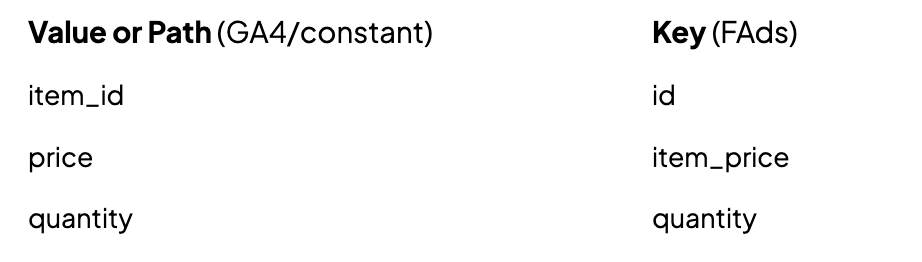
Where the ‘GA4 items-array’ can (and should) be as complete as possible, the ‘FAds contents-array’ should only consist of the following 4 available fields:
- id;
- quantity;
- item_price;
- delivery_category (not applicable for digital products, like the product in this example).
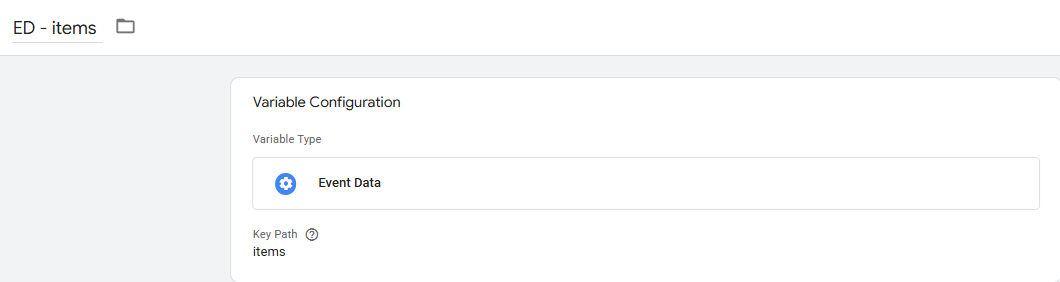
Next to CJSs, sGTM also does not support all Client-Side variables, like Datalayer Variables (DLVs) are also not supported. Usually, on Server-Side, ‘Event Data’ is captured using variables that are called ‘Event Data Variables’. Like with DLVs on Client-Side, you have to make one dedicated variable for each item from the Event Data.
Remapping the GA4 items-array into the FAds contents-array
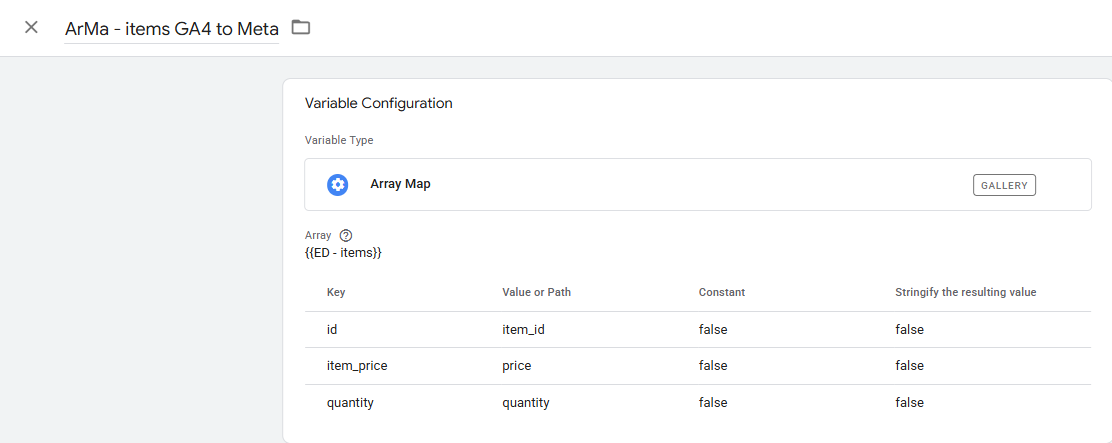
Although the Event Data Variable for ‘items’ will perfectly collect the GA4 items-array, it does not follow the ‘Standard Parameters’ from FAds and the array has to be ‘re-mapped’, using a custom variable template.
The simplest and quickest way to execute this, is to import a Variable Template from the Community Template Gallery to the sGTM container. For this specific re-mapping, we like to use the Array Map template from Sogody.
To add it to your sGTM container, go to:
Templates > Variable Templates > Search Gallery > Search for: “array map” > Add to Workspace

This will add the template to your sGTM container, and to re-map the GA4 items-array into the FAds contents-array, you have to add a new variable with the Variable Type just added from the Community Template Gallery: Array Map.
To add the variable to your sGTM container, go to:
Variables > New > Custom Templates > Array Map
As the ‘Input Array’ under ‘Array’, add your GA4 items-array; therefore, this is the array that we’re re-mapping using this variable.
Add a new row for each of the four FAds available fields. The FAds values belong to ‘Key’. The ‘Value or Path’ values are for the respective GA4 values from within the GA4 items-array. You could also set a Constant value, but then don’t forget to select the ‘Constant field’ too.
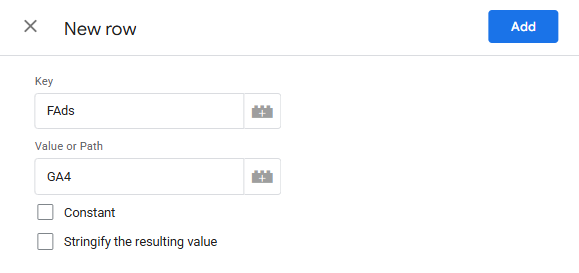
Since in this example we use a digital product (and this shop only sells digital products), which has no delivery_category, we only have to add 3 rows to the variable, one for each of the remaining available fields:
After you have saved the new FAds contents-array variable, you still have to add the variable to your FAds eCommerce tags.
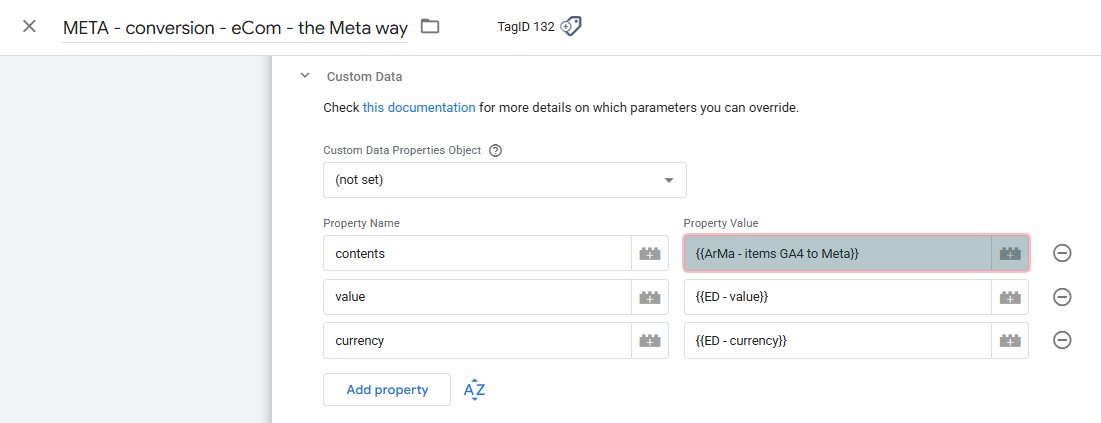
The usual eCom data to send to FAds are ‘contents’, ‘value’, and ‘currency’. Do this by adding the 3 static values under ‘Property Name’ in the section ‘Custom Data’.
On the right side, below ‘Property Value’, add the {{ArMa-items GA4 to Meta}} Variable next to the ‘contents’ field. Next to ‘value’ & ‘currency’, add your standard {{Event Data}} Variables.
The Meta way of Meta eCom – The succeeding way
Don’t forget to save your FAds tag, and after this, the Tag should fire perfectly.
The blue-highlighted areas now show a changed status, indicating that the tag fired and that all data was sent to FAds (Firing Status = Succeeded & HTTP Request = Response 200).
The yellow highlighted area has also changed compared to the first example; behind contents, we now only find the values that we have added in the re-mapped contents-array.

Bonus
One item of bonus, to improve your tracking even more, is also selected in both example images.
For the ‘Event Name Setup Method’, most choose and select ‘Inherit from Client’, where in most practical cases (at least until today) GA4 is used as the data-client.
Therefore, FAds will receive the GA4 eCom events in ‘snake_case’ (E.g., add_to_cart, begin_checkout, purchase), while FAds follows a completely different Event Naming convention, called ‘UpperCamelCase’ (E.g., AddToCart, InitiateCheckout, Purchase).
Only these events are not collected by your sGTM container; therefore, you have to transform the received GA4 event names using a ‘Lookup Table’ variable in your sGTM container.
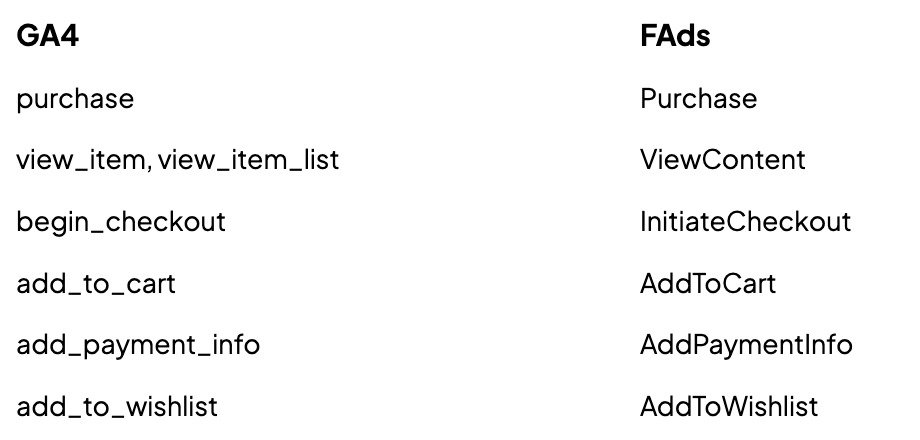
Besides a different Event Naming convention, FAds also measures and optimizes using fewer eCom events. Simply said: not all GA4 eCom events are utilized by FAds.
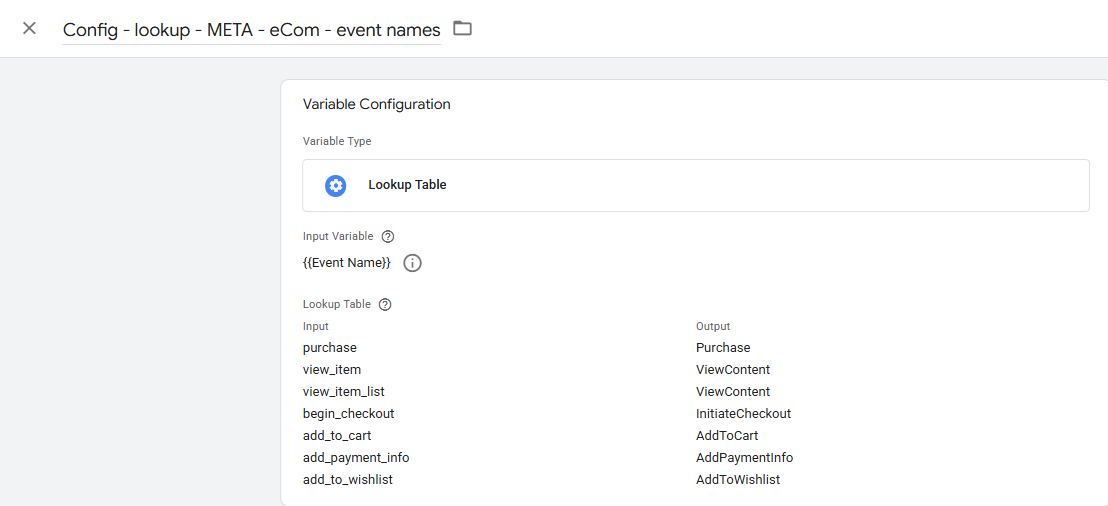
The following list shows which GA4 events are used and what their FAds translation is:
To make the lookup table variable, go to:
Variables > New > Lookup Table
Choose for the ‘Input Variable’ the standard {{Event Name}} from the dropdown menu. Add as many as 7 rows with the blue ‘+Add Row’ button. Place the GA4 ‘snake_case’ Event names in the fields on the left side, directly under ‘Input’.
While their respective FAds ‘UpperCamelCase’ Event names are placed in the fields on the right side, directly under ‘Output’.
Don’t forget to save the variable! We’ve used the following name: ‘Config – lookup – META – eCom – event names’.
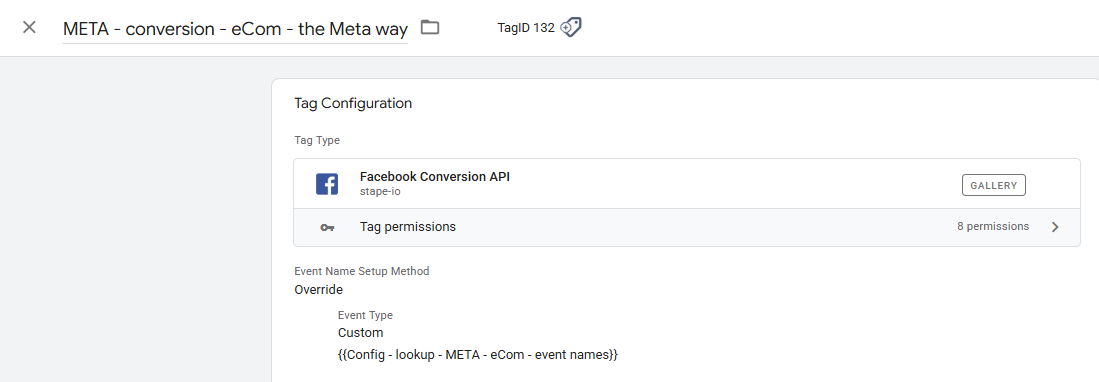
The last step is to add the newly made variable to your FAds eCommerce tag, open your tag, and change the dropdown ‘Event Name Setup Method’ to ‘Override’ and the ‘Event Type’ to ‘Custom’.
This will bring forward a Variable box, where you add your newly made {{Config – lookup – META – eCom – event names}}.
When you’ve made these two changes to your Server-Side FAds eCom tags, you have quite possibly changed a lot of failing tags into successful tags. But more so, you’ve improved your FAds account significantly, taking away rogue Events and unnecessary data.
Your FAds account will thank you for it.
Related Posts
Server-Side Tagging vs Tracking: Know The Difference
What's the difference? Server-side tagging vs server-side tracking explained,…

Seraphinite Accelerator Plugin: Speed Boost or SEO Risk?
Explore if Seraphinite Accelerator helps or harms SEO. Real cases, expert tips,…

GA4 vs Universal Analytics: What Marketers Need to Know
GA4 vs Universal Analytics: Learn the key differences & benefits of GA4 for…